TPG Community
Get online support
- TPG Community
- :
- Broadband & Home Phone
- :
- Modems and Devices
- :
- Re: ASUS DSL AC68U on TPG HFC
Turn on suggestions
Auto-suggest helps you quickly narrow down your search results by suggesting possible matches as you type.
Showing results for
Options
- Subscribe to RSS Feed
- Mark Topic as New
- Mark Topic as Read
- Float this Topic for Current User
- Bookmark
- Subscribe
- Printer Friendly Page
ASUS DSL AC68U on TPG HFC
- Mark as New
- Bookmark
- Subscribe
- Subscribe to RSS Feed
- Permalink
- Report Inappropriate Content
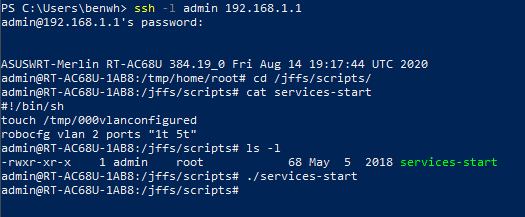
FYI the script doesn't echo anything back to the console; the commands don't create console output.
- Mark as New
- Bookmark
- Subscribe
- Subscribe to RSS Feed
- Permalink
- Report Inappropriate Content
Thanks for the tips @arc_nineohnine but I still did not have any luck.
This is how the console looked

I copied the login that TPG created from the old modem but it was not a good password they used. Would it still show the 'The network cable is unplugged.' error if an incorrect password was setup on the Asus modem or would it be a different error?
These are the admin screens if they are of any use


- Mark as New
- Bookmark
- Subscribe
- Subscribe to RSS Feed
- Permalink
- Report Inappropriate Content
@techie_one wrote:!! As jigsaw mentioned above, be warned, it's all over the internet that your router will not longer be supported after this process and also potentially brick your router
I had issues trying to upload the RT-AC68U onto my DSL-AC68U - my DSL-AC68U didn’t like it
I probably downloaded the wrong firmware but digging around, I managed to get it to work with these step by step using the gnuton firmware
Credit to jigsaw for sharing his steps!
Started from jigsaw’s post:
- https://community.tpg.com.au/t5/Modems-and-Devices/ASUS-DSL-AC68U-on-TPG-HFC/m-p/47532/highlight/tru...
- Instructions here on updating firmware - https://uktechhub.com/forums/topic/rmerlin-asuswrt-merlin-firmware-and-the-asus-dsl-ac68u-pppoe/
- Actual firmware to download for DSL-AC68U - https://www.snbforums.com/threads/dsl-ac68u-asuswrt-merlin-builds-for-dsl-routers.55985/
Here we go!
1. Download the latest DSL-AC68U Merlin firmware fork of the Merlin RT-68U firmware from https://github.com/gnuton/asuswrt-merlin.ng
a. Download just the RTX file (you don’t need to clone the Repo!)
b. Tested successfully using DSL-AC68U_384.17_0-gnuton1_DSL_1.0.4.9.trx on TPG FTTC / VLAN ID 2
2. Log onto DSL-AC68U Admin and restore to factory default
3. Configure laptop Ethernet adapter to static IP 192.168.1.10
4. Connect Ethernet to DSL-AC68U on “Router LAN Port 1” and open browser to 192.168.1.1
a. It should show Setup screen - do nothing here
5. Power off the DSL-AC68U
6. Hold down DSL-AC68U Reset with a pin and power on the DSL-AC68U
a. Wait until the Power Switch is “flashing slowly” and release the Reset button
7. Open browser to 192.168.1.1 and it should be be on a DSL-AC68U “firmware restore screen”
a. Upload the earlier downloaded custom gnuton TRX file and wait about 5 minutes until Router comes back up
8. Open browser to 192.168.1.1
a. Set admin password
b. Whilst it’s trying to detect DSL (which will fail), click Skip Setup Wizard and configure wifi
c. Click Complete
9. Navigate to WAN » Dual WAN
a. Enable Dual WAN
b. Primary WAN: Ethernet WAN on Port 4
c. Click Apply
10. Navigate to WAN » Internet Connection
a. WAN Connection Type: PPPoE
b. Enable 802.1Q
i. VLANID to 12 - (just set this to 12 for now)
ii. 802.1P to 0
c. Enter your TPG username and Password - Copy from the TP Link Archer router » Network » Advanced Screen
i. Username will be something like username@tpg.com.au
ii. Password is not your usual TPG account so check the TP Link Archer router
d. This is the TRICKY PART!
i. Open up the Browser Tools » Network Tab » tick the Preserve Logs
ii. Click Apply
iii. You will see the POST onto http://192.168.1.1/start_apply.htm
a. Right click and click "Copy as CURL"
b. You will end up something like:curl 'http://192.168.1.1/start_apply.htm' -H 'User-Agent: Mozilla/5.0 (Macintosh; Intel Mac OS X 10.14; rv:75.0) Gecko/20100101 Firefox/75.0' -H 'Accept: text/html,application/xhtml+xml,application/xml;q=0.9,image/webp,*/*;q=0.8' -H 'Accept-Language: en-US,en;q=0.5' --compressed -H 'Content-Type: application/x-www-form-urlencoded' -H 'Origin: http://192.168.1.1' -H 'Connection: keep-alive' -H 'Referer: http://192.168.1.1/Advanced_WAN_Content.asp' -H 'Cookie: JSESSIONID=e4f44662da2fb7b7ef991692f12345; asus_token=1xxoIxl45vhTxWr1QC4h3MQ12345678; clickedItem_tab=0' -H 'Upgrade-Insecure-Requests: 1' --data 'productid=DSL-AC68U&support_cdma=¤t_page=Advanced_WAN_Content.asp&next_page=Advanced_WAN_Content.asp&group_id=&modified=0&action_mode=apply&action_script=restart_wan_if%3Brestart_stubby&action_wait=5&first_time=&preferred_lang=EN&firmver=3.0.0.4&lan_ipaddr=192.168.1.1&lan_netmask=255.255.255.0&ctf_fa_mode=0&ctf_disable_force=0&wan_unit=0&wan_proto=pppoe&wan_enable=1&wan_nat_x=1&nat_type=0&wan_upnp_enable=1&upnp_pinhole_enable=0&upnp_secure=1&upnp_min_port_int=1024&upnp_max_port_int=65535&upnp_min_port_ext=1&upnp_max_port_ext=65535&ewan_dot1q=1&ewan_vid=12&ewan_dot1p=0&wan_dhcpenable_x=1&wan_dnsenable_x=1&dns_fwd_local=0&dns_norebind=0&dnssec_enable=0&dnssec_check_unsigned_x=1&dns_priv_override=0&dnspriv_enable=0&dotPresets=-1&dnspriv_server_0=&dnspriv_port_0=&dnspriv_hostname_0=&dnspriv_spkipin_0=&wan_pppoe_username=username%40tpg.com.au&wan_pppoe_passwd=passwordFromArcher&wan_pppoe_idletime=0&wan_pppoe_mtu=1492&wan_pppoe_mru=1492&wan_pppoe_service=&wan_pppoe_ac=&wan_pppoe_hostuniq=&wan_ppp_echo=1&wan_ppp_echo_interval=6&wan_ppp_echo_failure=10&wan_pppoe_options_x=&wan_vpndhcp=1&wan_hostname=&wan_hwaddr_x=&wan_clientid=&wan_vendorid=&ttl_inc_enable=0&ttl_spoof_enable=0'
c. Simply update the “ewan_vid=12” to “ewan_vid=2” and send the command to the router to set the WAN Port to VLAN 2!
d. Note that once the page has been updated to VLAN 2, you won't be able to update any other setting through the UI as the javascript will not allow the VLAN 2. So you want to update all the relevant chages and do the POST to update the VLAN 2 last
e. I was on Mac so I could use curl. If you are on Windows, use https://www.postman.com to POST the above
11. Navigate to Administration
a. Enable JFFS custom scripts and configs
b. Enable SSH on Port 22 (LAN only)
c. Click Apply
12. ssh/putty to the router on 192.168.1.1echo "#!/bin/sh" > /jffs/scripts/services-start echo "touch /tmp/00vlanconfigured" >> /jffs/scripts/services-start echo 'robocfg vlan 2 ports "4t 5t"' >> /jffs/scripts/services-start chmod 755 /jffs/scripts/services-start13. Connect the Router LAN 4 to your NBN FTTC device with an Ethernet cable
14. Reboot the router and bobs your uncle!
a. Quick test, connect your laptop to DSL-AC68U wifi and ping "8.8.8.8" to see if that works
15. If all is good, navigate back to Administration:
a. Disable SSH on Port 22
b. Click Apply
Successfully validated this on TPG FTTC on ASUS DSL-68U with the FTTC NBN Device!

Hi Techie_one,
I got given one of these modems and have followed your steps to get my FTTC working.
It connects successfully but its like its being throttled at 10/10 instead of 100. If I connect my old modem back I get perfect speeds. Any idea what could be throttling the connections?
Only thing is I had to try to work out was the MRU value. I used 1492. Could this be the problem?

- Mark as New
- Bookmark
- Subscribe
- Subscribe to RSS Feed
- Permalink
- Report Inappropriate Content
I literally just made an account here to say THANK YOU to the op
Finally working
Thank you so much
- « Previous
- Next »